I also had some black ribbon and foam letters on hand (thanks Mom! She gave them to me for the baby and I have have found many uses for them.). I know they are all different colors and that is why I painted them all black, if you are lucky enough to have a vinyl cutting machine you could use that too...but I don't have one of those (yet).
I started by painting all the letters black.
Next I laid out all the paint chips in the order I wanted them to be on the banner.
Now I have to admit that I tried to make this a pennant banner, I really did. But I could not get the triangle wide enough for my letters to fit onto them, so I cut out circles instead. I used my ribbon as the template for the circle.
I cut out a totall of 11 circles for the banner. There was no circle in between the two words, but a blank circle at the beginning and end. This was not intentional but I ran out of orange paint chips due to trying to cut triangles out....note to self, always grab more paint chips then you think you need!
After cutting out all the circles, I attached the foam letters the the circles. Did I mention that the letters are self-adhesive, Score Mom!
I then hot glued the letters to the black ribbon to hang the banner.
As for the blank circles at the end and beginning of the banner, I saw a cute project making pumpkins with paint chips (the reason I ran out of orange chips...). You take two different shades of orange chips and cut them into 1/2 inch strips the intire lenght of the chip. Each paint chip made about 4 strips, so I cut one chip of each shade of orange. This gave me enough strips to make two pumpkins.
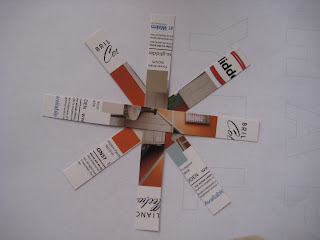
With your 1/2 inch strips cut out, you will lay the first color down in a "cross" pattern with the color facing down. Then you will take the second shade and lay it on top of the "cross" shape in an "x" shape, again with the color facing down. It will look something like this.
You then start to glue the "Star" shape together. I glued each strip together at the center where they all meet. Sorry there was no photo of this step.
Next you will grab the bottom strip and glue the two ends, over lapping one on the other. This will be your starting point.
Then you will start to glue the remaining strips to the center. I did all the strips one at a time.
When it was finished, it looked something like this.
I then cut out small leaves and stems for the pumpkins out of green paper. I then hot glued the pumpkin to the first and last circle on the banner. Make sure to glue in from the side that way you can see the leaves and stem of the pumpkin.
Here is the finish product.
For a project that cost nothing, I think its great.
Stephanie


No comments:
Post a Comment