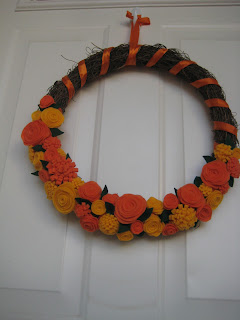
Here is the finished project.
Now I planned with only doing the rosette flowers, but while surfing the net (my favorite past time) I came up with another flower that looked really cute.
To make the rosette's, simple cute felt into a circle. The larger the circle, the larger the flower. You will then cut into the circle, in a circle pattern. Similar to the photo below.
Starting at the tip end, begin to roll the strip of felt in. I glued every few turns to hold it into place. When you get towards the end, the middle of the circle will fit as the bottom of the flower. The finished flower should look something like this.
The second flower I made is easier and quicker to make. You start with a strip of felt. Again the longer and thicker the strip, the bigger your flower. You want to glue the strip together length wise, so that the strip is folded in half, like below.
Once the strip is glued in half you want to cut small marks in the side of the strip that would be the folded side. (photo below)
Again, you will start gluing the strip and rolling it in. Similar to like rolling up a sleeping bag.
The finished flowers will look like the ones below ( not the rosettes.)
The only tip I can give is that make more than you think you will need. I did quite a few flowers with just 4 sheets of felt (2 orange, 2 yellow). Total cost of wreath- $1.50! I had the wreath and ribbon on hand from last Thanksgiving! I think it looks great.
Stephanie


No comments:
Post a Comment