Thursday, October 20, 2011

New Recipes

While the baby is napping....and lets hope it lasts, I thought I would share some of the great recipes I am planning on trying out soon. Most of my new recipes come from either cooking shows or Pinterest. (If you haven't heard of Pinterest, your missing out!). With friends and relatives at our home for the past two weeks, I was making large meals (mainly staples) to feed at least 6 adults at one time. Now that its just me and the Mr. I can branch out into my adventurous side. Take a look at these!


Artichoke and Spinach Bread from http://www.closetcooking.com/
So making this for Thanksgiving instead of Spinach dip!


Lemon Bliss Pound Cake from http://www.kingathurflour.com/
The next staple cake in my house


Broccoli and Cheddar soup from http://www.mangiodasola.com/
I love Fall!


Carmel Apple Cheesecake Bars from http://www.pauladeen.com/
Yummy!!!


Stephanie

Thursday, October 6, 2011

Paint Chip Fall Craft

Paint chips crafts (swatches, samples...whatever you want to call them) are everywhere right now! And why not, they are free and come in so many wonderful colors that the projects are endless. During a late night of searching the Internet I found a few projects that I thought would look better together for a fall banner. I went to my local Super store (you all know which one) and picked up different shades of green, yellow and orange for Fall.


I also had some black ribbon and foam letters on hand (thanks Mom! She gave them to me for the baby and I have have found many uses for them.). I know they are all different colors and that is why I painted them all black, if you are lucky enough to have a vinyl cutting machine you could use that too...but I don't have one of those (yet).

I started by painting all the letters black.


Next I laid out all the paint chips in the order I wanted them to be on the banner.


Now I have to admit that I tried to make this a pennant banner, I really did. But I could not get the triangle wide enough for my letters to fit onto them, so I cut out circles instead. I used my ribbon as the template for the circle.


I cut out a totall of 11 circles for the banner. There was no circle in between the two words, but a blank circle at the beginning and end. This was not intentional but I ran out of orange paint chips due to trying to cut triangles out....note to self, always grab more paint chips then you think you need!

After cutting out all the circles, I attached the foam letters the the circles. Did I mention that the letters are self-adhesive, Score Mom!


I then hot glued the letters to the black ribbon to hang the banner.


As for the blank circles at the end and beginning of the banner, I saw a cute project making pumpkins with paint chips (the reason I ran out of orange chips...). You take two different shades of orange chips and cut them into 1/2 inch strips the intire lenght of the chip. Each paint chip made about 4 strips, so I cut one chip of each shade of orange. This gave me enough strips to make two pumpkins.

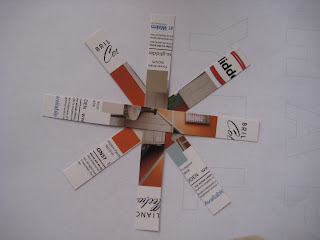
With your 1/2 inch strips cut out, you will lay the first color down in a "cross" pattern with the color facing down. Then you will take the second shade and lay it on top of the "cross" shape in an "x" shape, again with the color facing down. It will look something like this.

You then start to glue the "Star" shape together. I glued each strip together at the center where they all meet. Sorry there was no photo of this step.

Next you will grab the bottom strip and glue the two ends, over lapping one on the other. This will be your starting point.


Then you will start to glue the remaining strips to the center. I did all the strips one at a time.


When it was finished, it looked something like this.


I then cut out small leaves and stems for the pumpkins out of green paper. I then hot glued the pumpkin to the first and last circle on the banner. Make sure to glue in from the side that way you can see the leaves and stem of the pumpkin.


Here is the finish product.


For a project that cost nothing, I think its great.


Stephanie

Tuesday, October 4, 2011

Fast Pine Cone Revamp

I was inspired a few months back (as well as my mother) by a lady who made Christmas trees out of pine cones. They were amazing and even though I knew I would never attempt it, I started picking up pine cones around my neighborhood anyways for fall and Christmas. My mother has been hard at work making the pine cone trees and I am sure everyone on her Christmas list will be getting one this year.

I saw a photo of pine cones with their tips painted white and thought " So cute for winter". But winter is still a few weeks off and I was bored yesterday so.....I started painting them anyways. I thought I would paint some yellow and orange too for fall, but quickly realized I only had yellow in my paint box and didn't feel like running to the store, plus it was nap time and I was not waking that baby up. ( Have you ever just wanted to do something right then...or is it only me.)

First I picked pine cones that were somewhat open, their tips are just easier to paint that way. Grab yourself some white paint and a sponge brush and you are on your way!

All you need to do is sponge the tips on the cones. Like this...


It will look something like this when you are finished.


I only did about 6 or 7 for the vase that I planned to put them in, but trust me I have about a billion more to do. Okay more like 2 grocery bags full....more projects, yes please!


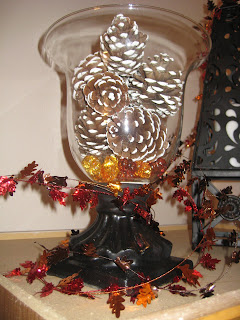
Here is what they looked like in my vase ( My re-done thrifty find vase for a buck by the way!)


Oh yeah- Thanks to my Mommy for making me this great Blackboard platter for my birthday! Love it. Can you tell where I get my crafty side from?


Stephanie

Monday, October 3, 2011

Green Chili Stew


I love Fall! It is my favorite season. Cool evenings, holidays, and warm soups and stews to cook! Even though I make this stew/soup all year round, I just love it during the fall.  The first thing to know about Green Chili is that you have to have Hatch New Mexican Green Chilies. You can use the little cans of chilies that you find in the Hispanic isle in the supermarket, but it will not taste the same. I bought a 30 pound sack and roasted them all myself this year.
They freeze great and I have chilies all year round. Their season usually starts in late August and they grow into the fall, but they have to be Hatch. (This is my freezer with all my chilies....my father-in-law is so jealous!).

Sorry that I don't have a picture with all the items involved but there will me a recipe at the bottom of the post.
You begin with Pork. The rougher the cut of meat, the better. This is pork shoulder cut into bit size pieces. Brown off the pork and drain off the fat. I usually just season with salt and pepper at this point.


While the pork is browning, cut up your potatoes, onions, green peppers, garlic, and chilies.
Add the vegetables into the pot with the drained pork and cook for about 5 min.


Add one can of pinto beans and one quart of chicken broth. You are also going to add water to the stew, but just enough to cover the vegetables.


You are now going to add the spices, Chili Powder, Cayenne Pepper, and Cumin. If you want the chili to be more mild, cut back on the Cayenne and chili powder.  


Let the stew simmer for about an hour. If you would like the stew thicker, add a simple slurry of corn starch and warm water. Whisk into the stew to limit lumps.


We usually top the stew with cheese and serve with warm tortillas. You can also use cilantro, avocado, lime and tortilla chips!


Green Chili Stew ( approx- 6 servings)
1 1/2 to 2 pounds Pork Shoulder - cut into bit size pieces
4 large Russet Potato's- peeled and cubed
1/2 large onion- diced
1 green pepper- diced
2 cloves or 1 tablespoon garlic- minced
5-6 Hatch Green Chilies - Roasted and peeled, diced. Can substitute 2-3 8oz cans of diced chilies.
       *For a less heat level, reduce the amount of chilies used or purchase mild chilies. I usually always  buy Med or Hot.
1 can Pinto Beans- Drained and rinsed
1 quart Chicken Stock
Water to cover the stew
2 teaspoons Cumin
2 teaspoons Cayenne Pepper
2 teaspoons Chili Powder
Salt and Pepper to taste


Stephanie

all crafts Homemade Projects ~ Add Yours {10/4}
<a href="http://tipjunkie.com/" target="_blank"><img src="http://www.tipjunkie.com/images/TipMeTuesdayButton1.png" alt="Tip Junkie handmade projects" border="0"/></a>

Laugh, Love, and Craft 
<center><a href="http://laughloveandcraft.com/%22%3E%3Cimg border="0" src="http://i1121.photobucket.com/albums/l514/LSchwietz/SharetheWealthWednesday-1.jpg%22/%3E%3C/a%3E%3C/center>

Halloween Wreath


Okay, I am a sucker for a good wreath. I see one I like and I have to try it out....its a weakness I am not proud of. I have seen these Candy Corn wreaths all over the Internet and thought "How hard can that be....". Turns out they are super easy! The tough part was finding the Candy Corn. All I could find at a certain store was Indian Corn (Brown on top instead of White). I finally found them at the trusty Dollar Store (Love that place!) It took about a bag and a half for the 14 inch wreath, but you need to buy at least 2 bags due to some of the corn being deformed.

Items you will need:
Foam wreath
Black spray paint
Black Ribbon
2 bags Candy Corn
Hot glue and Hot Glue Gun


This is a shot of my craft table ( aka our dining room table). Needless to say my husband is not happy that Fall or the Holidays are coming. This table will only be clean for Thanksgiving/Christmas.

I started by spray painting the foam wreath black. You could also rap the wreath with black ribbon, but I was trying to be cost effective and had the spray paint on hand.


I let the dog play outside while I was spray painted and the baby slept.


I started gluing the Candy Corn on the wreath in a single row with all the candy pointing in the same direction. I started the row in the center of the wreath as well. Then once I had the first row completed, I started the second row pointing in the opposite direction.


Each row was pointing in the opposite direction to the row above it ( I hope that makes sense, if not look at the finished photo).


I finished the wreath with a black bow. I think it turned out pretty good. I was also thinking of other candies that could be used for other holidays. Possibly peppermints with red hots for a Christmas wreath.....my husband is going to kill me! HAHAHA


Stephanie

all crafts Homemade Projects ~ Add Yours {10/4}
<a href="http://tipjunkie.com/" target="_blank"><img src="http://www.tipjunkie.com/images/TipMeTuesdayButton1.png" alt="Tip Junkie handmade projects" border="0"/></a>