Saturday, August 27, 2011

No Sew Grocert Chart Cover

Lauren sent me a link to make a no-sew cart cover....I think she was trying to tell me something. Either she thinks I need one or she knows I can't sew. Its both. I am trying to learn to sew but that is another post altogether.

On Little Rays of Sunshine http://morrowsunshine.blogspot.com/2011/04/no-sew-shopping-cart-cover-tutorial.html , they have a great tutorial to help you get started. Basically it is a over-sized blanket....With that in mind I took the tutorial and ran with it. I thought that the tutorial had too much material and altered the measurments a little (wish I would have done it a little bigger...you will see).

Joann's was having a sale of Fleece so I picked up a yard of this cute print. I didn't want something really baby-ish or to pink.

I measured it out to be 46 length x 28 width. Place the material right side down.


After measuring out the material, cut 4x4 squares out from the corners.


After all the corners are cut, cut 1 inch strips 4 inches into the material. (Hope that makes sense- the photo will help explain.) I marked the 1 inch with dots to help me make them all the same width.

After all the strips are cut you cut a small hole at the top of the strip. You will turn the strip over on itself and slide it through the hole, pull it through. Again I hope the photos help.


Once you are done with all the strips (on all four sides) you can measure for the feet holes. I found the center of the width (it was 20 inches wide now because of the 4 inch strips on either side. ) and then measured 18inches up from that center. Does that make sense...... Once I had the 18 in up from the center I added an inch on either side and make a dot with my pen. From the dot I measured 5 inches across and the 5 inches down. Basically I made two 5x5 boxes.


I waited until I was at the store to make holes for the chart seats straps. Here is what it looked like finished.


(Not sure why this photo is like this....) So if I could change one thing I would have flipped the blanket so that it was 46 width and 28 long.....before I cut the feet holes but I still like it! I think I will try another one when I find another deal on Fleece.

Stephanie

Bountiful Baskets!

My great friend, Leanne, let me know about this great organization. Bountiful Baskets is a food co-op that is completely volunteer and non-profit. They have great deals on veggies and fruit! They operate in 16 states! Check what I got this week-


All this for 10 dollars! Plus I got a 30 pound bag of Green New Mexico Green Chilies to roast (YUMMY!) for only 19 bucks! I love this idea. I also got there a bit early and volunteered to help out, which I recommend. (If you volunteer you get your basket first! It was worth it.)


Stephanie

Craft Fair Updates!

Well, I know we both have been slacking on the posting thing, but its summer.....(I sound like a kid who doesn't want to do his homework!). Truthfully we have been so busy this summer. The kiddos are getting bigger ( and new ones are coming to join our extended family), we just have our hands full! Here are some great pictures from our 100th Year Anniversary at the Harvey House in Barstow.


Can't wait until the next one. I will be there in spirit with Lauren!

Tuesday, August 16, 2011

Moss Covered Initial

I have just finished my first moss covered initial and I think I am addicted! I have seen this all over the Internet and thought maybe I could handle this one. Sometimes I see things and think it is easier than it looks and most of the time I am wrong! But this one is simple. I purchased our last name's initial at Robert's Crafts (the largest they had), I believe it was 14 inches tall. It was not my favorite font, but the other options they had were too small.

I hot glued moss from the Dollar Store onto the letter. Be prepared to use about 5 sticks of glue (next time I may used spray adhesive). After making sure the whole letter and the sides were covered, I cut a strip of left over burlap for the hanging ribbon. I taped the ribbon to the back of a 11x14 frame, you could also put it over a mirror. I think it came out great!


Stephanie

all crafts Homemade Projects ~ Add Yours {8/16}
<a href="http://tipjunkie.com/" target="_blank"><img src="http://www.tipjunkie.com/images/TipMeTuesdayButton1.png" alt="Tip Junkie handmade projects" border="0"/></a>

Sunday, August 14, 2011

Its Christmas in ....August?

Okay so usually everyone promotes Christmas in July ( at least all the stores want to, Michael's already has decor out), but it just seems to hot to think about snow and cold. So August may work better in my opinion. I have already been looking for some ideas this year on gifts, decorations, and more. Here are some of the ideas I have found that I can't wait to try out.


Love this idea of personalizing mugs. Personalizing items can be pricey, but not if you know what your doing. http://www.howdoesshe.com/ has a great tutorial on how to make these from Dollar Store finds!


This Coconut Sugar Scrub from http://www.aprettylifeinthesuburbs.blogspot.com/ is great for moms and sisters!


Okay, I know this is more for Autumn, but who would not love a Carmel White Chocolate Apple! Great for neighbors or co-workers. Awesome recipes at http://www.howdoesshe.com/


Great idea for ornaments! Photo frames for the tree, LOVE IT!


Great Hot Coco Mix to go with those mugs! http://www.littlebirdiesecrets.com/

Thursday, August 11, 2011

Craft Fair

Myself and Lauren will be at the Harvey House Craft Fair on Saturday, August 20th. Here is just a taste of what will be there!


Covered Diaper Cases


Vintage bottles transformed into decorative item and/or vases
 
 
Come by and check us out!

Stephanie

Wednesday, August 10, 2011

Burlap Message Board

Okay, so I have been pre-occupied with the baby shower for the last few weeks and have been neglecting my other projects. Time to get cracking! So I have had this message board idea for awhile (months, in fact!) and I finally did it last night. I bought this picture at my favorite store, Tai Pan Trading, for $5 in one of their great sales. I really only wanted the frame, so please disregard the print.


I had purchased some burlap (on sale of course) at Joann's for $2.99 a yard. It only took about half of that, but I can always use burlap for something else. The ribbon was a black and white design to break up the burlap a bit.


After I took apart the picture, I could get to work.


I started by gluing some batting down to the back of the picture.


I followed that with the burlap. Make sure your pull your burlap tight.


Not too bad for my first one!


I made the rookie mistake of not buying enough ribbon to do the entire board.....so I came up with just doing an X.... I think it looks OK.


At least my husband likes it....


Stephanie

Thursday, August 4, 2011

Chocolate Pops

Okay, the last posting about the baby shower.....until Lauren posts something. We thought that having some treats on the tables (as well as the beautiful necklaces that Lauren made) would be a nice addition. So, I found (after hours of surfing on the Internet) hard candy bird house lollipop molds.

I had to have them! I bought one mold ( my first mistake- should have bought two) and the chocolate and got started.


All the other supplies were picked up at Micheal's.
Lollipop sticks, Ccellophane bags, Chocolate melts ( White, Milk and Dark Chocolate were used)


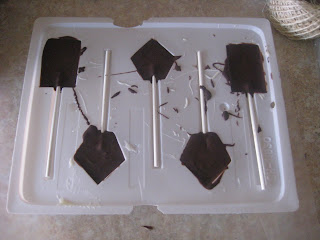
I had to melt the chips in small batches. The mold only held 5 lollipops at one time.


After the chocolate was poured, I put the lollipops in the freezer for about 5 minutes to be safe.


They came out so cute!


I rapped them in twine to match the over all look of the shower. Three bags of melts made about 50 lollipops. They were a hit!

Stephanie

Bird Baby Shower

And what you have all been waiting for.... The Bird Baby Shower photos. Thank you again, Lauren for taking great photos. We both had a great time planning and being creative to make our friends day special.
We love you Leanne!


Our bird house center pieces and the wishing tree.


Our chocolate pops, Lauren's "baby" banner, and Lauren's bird necklaces favors.


Everything was a great hit! We can't wait to do another one.

Stephanie

<center><a href="http://www.whipperberry.com/"><img src="http://whipperberry.com/wp-content/uploads/2011/08/featured_on_box.jpg

all crafts Homemade Projects ~ Add Yours {8/8}
<a href="http://tipjunkie.com/" target="_blank"><img src="http://www.tipjunkie.com/images/TipMeTuesdayButton1.png" alt="Tip Junkie handmade projects" border="0"/></a>

Baby Bird Wreath

Sorry, I know we are late in posting the Baby Bird Shower photos but Laurens photography show was flooded (not joking). Everything is great but it is taking her some time to get me all the great photos. In the mean time, I thought I would share a quick little wreath project that I put together for the shower. We ended up not using it, but I plan on keeping it for next spring.


I used a vine wreath that I had laying around and some of the extra hand sewn birds from the shower. With some of the scraps of material, I decided to make a pennant banner. I cut out a triangle out of card stock and cut 9 pieces ( using three different patterns). I then used some left over ribbon that worked with the color scheme, making sure that I left about 3 inches longer on each side than the width of the wreath.

Marking the width of the wreath on the back side on the ribbon, I began to hot glue the triangles in place (alternating patterns). After that I cut a smaller piece of ribbon (the width of the wreath) to hot glue onto the back of the triangles to give the pennant banner some body so it would lay flat.

I then took some left over moss and glued it to the bottom of the wreath. The eggs are from Easter decor ( The Dollar Store), I choose the green ones to go with the ribbon. I then glued two of the hand sewn birds on the wreath as well.

I am sorry that I did not take photos as I went with this one, it was really done at the last moment.

Stephanie

Monday, August 1, 2011

Baby Bird Diaper Cake

Some of our great friends are expecting their first baby in September and they asked me and Lauren to help out with the baby shower.....of course! We LOVE planning and crafting, this is right up our ally. So because the parents-to-be have decided not to find out the sex, they went with the neutral theme of birds for the nursery. Birds are so in right now it was super easy to find things for the shower!

I decided that I would make a small diaper cake for the cake table at the shower. Our friends are taking on the hard task of using cloth diapers ( more power to you!) so this craft was easier than I thought it would be. I started out by shopping around for the topper of the cake. I have seen so many cakes (and received some myself) and I didn't want it to be to crowded with gifts, just simple.

I found this small musical bird at Joann's for around 5 bucks. I also found swatches of this branch fabric at Joann's for around a buck a piece. The diapers are a size 2 (husband bought a brand I really didn't care for, so I used them for this project). And I cut a circle out of a cardboard box.


(Sorry, this is a horrible photo.) Because I knew she was not going to be re-using the diapers, I used hot glue. I rolled all the diapers up, starting from the opening of the diaper so that the ends were smooth.


After rolling about a million diapers ( just kidding, it was more like 30), I started gluing them into circles. The larger circle was around 12, the smaller one around 7.


I then glued the smaller circle on top of the larger one. Then glued the entire thing to the cardboard circle.


I cut the fabric into strips that would fit the height of the diapers. Now, I have no skills in sewing, I do not own a sewing machine. I hot glued one side ( length wise) down to have a smooth seem. I then glued the fabric to the diaper ring.


Note: My fabric was not long enough to go around the larger of the circles so I had to use two pieces. One over lapped the other to give it a smooth look.


I then took crinkled paper strips ( you can find these at any store now for presents or gift baskets). I glued the paper around the bottom to cover the cardboard circle and around the other layers.


I bought this small bird house garden stake at Target back during Easter and it was a perfect fit for this. I stuck it through both layers and it also doubled as a bit of support for the cake too. I didn't glue down the bird (I want her to use it!), instead I used some double sided tape to hold it in place.


all crafts Homemade Projects ~ Add Yours {8/1}
<a href="http://tipjunkie.com/" target="_blank"><img src="http://www.tipjunkie.com/images/TipMeTuesdayButton1.png" alt="Tip Junkie handmade projects" border="0"/></a>

 
Stephanie